Tuesday, September 21, 2010

Twin Drive

I went ahead and mounted the second Gear Drive system.
I have some work to do to this shoulder, But I wanted to see how they
would look inside the droid.

Monday, September 20, 2010

More 2-3-2

The drive system is bolted in the frame now.
I had a hard time figuring out how to bolt all the parts and being able to get to
the screws.
I drilled a 1/2 inch hole just above the main shaft on the gear and the way I bolt everything is:
Bolt the bearing to the frame, Through the 1/2 inch hole screw the body to shoulder hub
to the outer flange of the bearing.
Then mount the drive system into the frame.
I'll show pictures next time.
Now the only thing I need is the drive motor. getting the right size, speed and strength will be the hardest part.

Saturday, September 18, 2010

Shoulder Work

I cut a body to leg circle today and I routed into it to mount a aluminum
plate. The plate will act as a gear so the D shaft from the gear box will
have something to lock and turn the legs.

You can see the bearing bolts to the circle and the aluminum plate is under it.
The shoulder looks off right now because I need to sand it with my drum sander to true the circle.
It really is not that far out of round it's just the camera makes it look bad.
The bottom picture shows the gear box inside the frame. It's not bolted yet,
It's just for the picture.


2-3-2 Motor

I got this motor setup out of a brand new Linear Garage Door Opener.
The opener is rated at 1/2 Hp and can lift up to a 18 foot x 7 foot garage door.
It's more than enough to move the legs.
It already has limit switches built into the drive system.
All I need is to locate another one for the other outer leg.


Wednesday, February 3, 2010

Bearing Update


I had to order some new bearings for the shoulders.
The one's I had were 6 inch which was fine, But they would not leave enough
room at the skins for the legs to be removed easily.
So, I ordered some 4 inch bearings and they fit perfect.
Actually I may have stumbled onto something Dave E. had already thought about.
In his plans the shoulder area has 4 drilled holes that do not come into play.
Unless you are adding this same bearing. The holes are a perfect fit.

Sunday, January 17, 2010

General Update


Here's where we all stand as far as the new Droid builds.

Outer Skins


After the inner skins have dried and sanded, The outer skins are next.
Here again I had to let Brenda do the gluing since I can't see it run.
The back door is also being taped and glued into place.
I didn't go into much detail about this process because Dave's plans
already tell much about the process.

Tuesday, January 12, 2010

Skin Bonding


I found out that I can't glue :o(
Brenda had to do all the gluing because I can't see the drip that runs down the frame. She's got the glue down pat. It's such a small amount that it's almost like
not even using any at all.
But here's the body after a good sand with 220 grit paper.
I don't know if Dave E. sands his droids, But I like how it smooths every spot out.
Next will be adding the outer layer of skins and more sanding.

Wednesday, January 6, 2010

Inner Skins


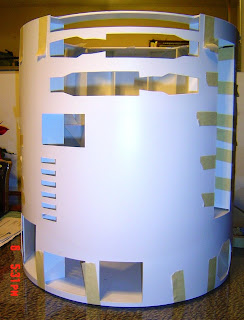
After building your frame, It's time to lay on that 1st layer of skins.
You tape the front and back skin to the frame and adjust it the best you can so
all the doors and pockets line up.
You may have some spots that just don't set edge to edge and it may be a off spot
in the frame. I tried my best to get everything perfect, But I do have some bad spots.
Once your satisfied with the fit, You glue the skin to the frame from the inside.
I learned that when you use Weldon Glue, Use it very lightly.
Just a rolling drip down each frame rail that touches the skin is enough.
If you use to much glue it will melt and warp the skin. I would practice on some
scraps before you glue the real thing.

Frame Mod


The pictures show where I have been adding supports to the side area of the frame
and top the back of the frame. Do you need this in a Dave E. Frame? No.
I'm adding these because I wanted the frame extra ridged to with stand the torque
from going from 2 legs to 3 legs.
I will add some more supports to the front of the frame once I get the skins mounted.
Adding the supports sure made the frame much stronger, But it will make it a little
harder to get the glue to the inner skin.